Capturing Still Images
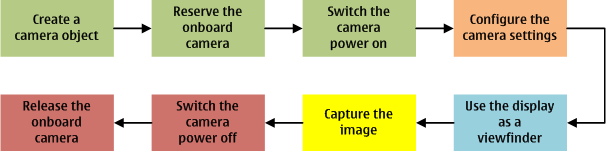
To capture still images or to use the display as a viewfinder, build your application around the Symbian Ecam camera utility. To make use of the device camera to capture an image, the application needs to repeat the steps described in the illustration below.
Important implementation considerations include:
The settings you can use in your application depend on what the camera hardware on the device supports.
To capture images, use the methods of the CCamera and MCameraObserver2 classes to construct your application. MCameraObserver2 uses the advanced camera features of the CCamera::CCameraAdvancedSettings class. The CCamera and MCameraObserver2 classes are defined in the ecam.h header file. Add the following line to the .h file, which is used to deploy the API:
#include <ecam.h>
Make sure you have correct capabilities information set for your application. You need at least the UserEnvironment capability.
Make sure ecam.lib is accessible to your linker when compiling your application by including it in your mmp file or by editing the project properties in your IDE, depending on your build environment.
To capture still images on a mobile device
Initialize the onboard camera.
Create a camera object using the CCamera::New2L() method.
Reserve the camera for your application using the CCamera::Reserve() method. MCameraObserver2::HandleEvent is called upon completion.
Switch on the camera power using the CCamera::PowerOn() method. MCameraObserver2::HandleEvent is called upon completion.
If needed, share the camera between multiple clients using the CCamera::NewDuplicate2L() function. This function needs the handle of an existing camera object (use CCamera::Handle()).
Configure the camera settings.
Before you adjust the settings, make sure the camera hardware supports the particular option. Use CCamera::CameraInfo() to retrieve and TCameraInfo to specify the camera information.
For example, to find out what image formats are supported by the onboard camera, use the TCameraInfo::iImageFormatsSupported member variable.
Specify the image format using the CCamera::PrepareImageCaptureL method. For a list of possible formats, see CCamera::TFormat.
Devices support image capture in EXIF JPEG format (CCamera::EFormatExif), which is encoded with JPEG and requires no additional conversion.
Specify the desired image size using the CCamera::EnumerateCaptureSizes() method.
Additionally, you can set, for example, the brightness, contrast, zoom level, flash mode, exposure and white balance of the image. For more information on the options, see the CCamera::CCameraAdvancedSettings class. You can also use the settings directly under CCamera.
Before you can call CCamera::CaptureImage(), allocate memory and set up image format, size and clipping rectangle using the CCamera::PrepareImageCaptureL() method. This needs to be called only once for multiple captures.
Use the display of the device as a viewfinder by transferring image data from the camera to the display memory.
Start the transfer of viewfinder data with direct screen access using the CCamera::StartViewFinderDirectL() method.
Transfer viewfinder data as a bitmap using the CCamera::StartViewFinderBitmapsL() method. MCameraObserver2::ViewFinderReady is called upon completion.
Set viewfinder mirroring on and flip the image horizontally using the CCamera::SetViewFinderMirrorL() method.
Stop the transfer of viewfinder data to the screen using the CCamera::StopViewFinder() method.
Capture one or multiple images using the CCamera::CaptureImage() method. MCameraObserver2::ImageBufferReady() is called upon completion.
To exit the application or to switch it to the background, switch off the camera power using the CCamera::PowerOff() method and release the camera for other applications using the CCamera::Release() method.
Additional information on capturing still images
For reference examples, see:
Camera Example: Capturing and controlling the images using Camera
Introduction to the Camera API on the Symbian Foundation
S60 Platform: Camera Example on Forum Nokia.
For information on how to capture an image using Time-Nudge-Capture drive mode, see Using Time Nudge Capture Drive Mode .
For information on how to capture an image using standalone background processing, see Background Processing for Ecam.
For information on displaying images on the screen, see Image Display Library Overview
Copyright ©2010 Nokia Corporation and/or its subsidiary(-ies).
All rights
reserved. Unless otherwise stated, these materials are provided under the terms of the Eclipse Public License
v1.0.