Enabling Multiple Pointers in the Emulator Tutorial
This topic describes how to configure the Symbian emulator to enable a multiple pointer environment.
Variant : ScreenPlay . Target audience : Application developers.
This topic builds on Support for Multiple Pointers in the Emulator Overview .
Configuring the emulator
Make sure that two or more mice are plugged in and detected on the Windows PC on which the emulator will run. The number of detected mice can be from two up to the maximum number defined in the HAL HALData::EPointerMaxPointers attribute.
-
Add the following lines to the \epoc32\data\epoc.ini file. These lines enable ScreenPlay and multiple pointers.
SYMBIAN_BASE_USE_GCE ON EnableMultiTouch ON -
Specify the MultiTouchProximityStep and MultiTouchPressureStep values in the \epoc32\data\epoc.ini file to define the proximity and pressure steps.
         MultiTouchProximityStep 10
MultiTouchPressureStep 200
If the above two options are not defined in the epoc.ini file, the default proximity and pressure steps are taken from the following HAL attributes.
         HALData::EPointer3DProximityStep
HALData::EPointer3DPressureStep
Result : Launch the emulator to verify that the mice are detected and displayed inside the application window area. When you move a mouse or scroll the mouse wheel, its X, Y and Z values are reflected in the status bar.
Enabling and disabling multiple pointers
Multiple pointers are only required by UI applications. Therefore, multiple pointers are enabled inside the orange rectangular area shown on the following diagram. Inside the area two Windows pointers are displayed. The one numbered zero is the system pointer and the other is used only for emulating touch with two fingers. The first mouse to report events to the emulator is automatically taken as the primary mouse, which owns the Windows system pointer.
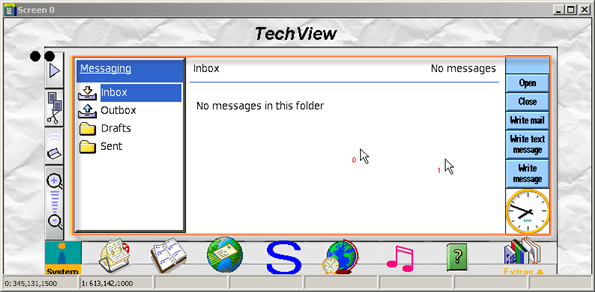
System pointer . Once the system pointer moves outside multiple pointer area, multiple pointers are temporarily disabled and standard emulator pointer behavior is resumed. This means that only one Windows system pointer is displayed and it is controlled by both mice.
Non-system pointer . If the non-system pointer moves out of the multiple pointer area, the pointer just disappears from the screen. Disabling multiple pointers is then not necessary because the system pointer behaves normally inside the multiple pointer area. Moving the non-system pointer back into the area makes it reappear on the screen.
Copyright ©2010 Nokia Corporation and/or its subsidiary(-ies).
All rights
reserved. Unless otherwise stated, these materials are provided under the terms of the Eclipse Public License
v1.0.