Going Beyond Hello: A Tutorial for Symbian C++ Applications
This tutorial shows how you can extend that basic example to create a small paint application, along the way learning more about the application frameworks (e.g. defining menus, how to handle touch-screen events, drawing to the screen etc.).
In the Symbian C++ Quick Start you learned how to create a basic example application using Carbide.c++, and how to build and run it on the Windows emulator and on a device.
Comes with Code: File: HelloSymbianWorld Example Code.zip
Application Structure
Carbide.c++ offers two ways of exploring your project. The traditional Project Explorer window, which can also be found in Eclipse, lists the files belonging to the project in the same directory structure as in the file system.
The Symbian Project Navigator contains the same contents, but displays them in a logical hierarchy according to Symbian Conventions.
You might wonder why a basic "Hello World" application contains so many files. The answer is straightforward - a much simpler Hello World wouldn’t be a very good starting point for real-world applications.
Instead the wizard generates the project for a complete and readily extensible application. The project separates code and data, and uses a form of the model view controller pattern for structuring your code. The application already reacts to system events and contains everything that is required for localization.
\group
bld.inf: Component-definition file. This specifies the mmp files that belong to your component, any shared header files that it exports, and the default build targets (e.g. GCCE, WINSCW).
Bld.inf is used to generate the makefiles and abld.bat used to build for the command-line (see Symbian C++ Quick Start).
This file is the starting point when you want to import a Symbian C++ project into Carbide.c++, because it contains references to all executables in your project (see the section on Importing Other Examples).
HelloWorld.mmp: Project-definition file. This specifies how to build an executable (in this case HelloWorld.exe) in a platform- and compiler-independent way. It contains information such as resource files to be compiled, source files to include when compiling, and the libraries to include when linking.
Icons_aif_scalable_dc.mk: Makefile used to create the application's icon from the *.svg file in the /gfx folder.
\src
HelloWorldApplication.cpp: This file contains the entry point for the EXE file (E32Main()) as well as the implementation of the Application class (which provides some basic functionality for the GUI framework). Normally this is "boilerplate" code and you do not need to make any changes.
HelloWorldDocument.cpp: This class is supposed to take care of the persistent data model of your application and therefore provides some functions to load and save .ini files. This mechanism is disabled by default - for most applications you may treat this as "boilerplate" code.
HelloWorldAppUi.cpp: This is the main controller of your application. It contains the logic for handling application-wide events (so you don’t have to handle, for example, the exit event in every view). It owns all the views that you use.
HelloWorldContainerView.cpp: This is a kind of controller, which is responsible for handling events and the UI elements of the currently visible view. It’s not visible itself, but owns and manages the Container (below), which corresponds to the view in the traditional model view controller pattern.
HelloWorldContainer.cpp: Contains the UI elements that should be displayed by the view. Therefore, the ContainerView and the Container usually have a very strong relationship.
During start-up, one class instance creates the next:

\inc
HelloWorldApplication.h, HelloWorldDocument.h, HelloWorldAppUi.h, HelloWorldContainerView.h, HelloWorldContainer.h: Header files corresponding to each of the main source files above.
HelloWorld.hrh: UIDs/identifiers for UI elements including views. These are shared between the resource file definitions for UI elements and the source code command handlers.
HelloWorld.pan: Panic code and method definitions.
\data
HelloWorld_reg.rss: Contains registration information about the application, such as its title.
HelloWorld.rss: Main resource file. Contains additional information about the application, as well as user interface and text resource definitions.
HelloWorld.loc, HelloWorld.l01: Localization files. Strings used by UI are defined in separate localization resource files. Each file has the format .lxx, where xx is a language specific numeric file extension - e.g. UK English is ‘01’, French ‘02’ and German ‘03’. The .loc file is a kind of junction that #includes the language specific files. The languages are compiled into separate resource files (extension .rxx; the resource file for the current language is loaded by the UI framework at runtime
\gfx
list_icon.bmp, list_icon_mask.bmp, mark_icon.bmp, mark_icon_mask.bmp: Bitmap and bitmap masks. These are compiled into the MultiBitMap (mbm) format for display in the application.
qgn_menu_HelloWorld.svg: SVG-T image that gets compiled into the HelloWorld_aif.mif MultiImageFile (mif) used for the application icon.
\sis
HelloWorld.pkg: Defines the contents that should be packaged into the installable .sis file for the device. This includes the executable as well as all resources required by the application (graphics and so on).
HelloWorld.sis: Compressed and self-contained installation file for the device. Compiled based on the package file.
HelloWorld.sisx: .sis file which has been signed with a certificate (in this case self-signed).
Extending Hello World – Drawing
To make our application a little bit more interactive, we are going to implement a simple paint tool, allowing the user to draw lines by touching the screen.
We could draw the lines directly on the screen, but then everything would get lost when something caused our application to redraw the screen – for example, a telephone call that came through while our application was running. Therefore, we have to draw the lines to a bitmap, which is simply copied to the screen whenever required.
Another solution (more difficult but also more flexible!) would be to store all lines in a list and to iterate over the list each time the application needs to draw the contents of the screen.
Using the SDK Documentation
The class that can handle bitmap data is called CFbsBitmap. Let’s take a look at the documentation for this class to find out more about the required header files, libraries and available methods.
Search the online documentation for the class you're interested in, in this case CFbsBitmap. CFbsBitmap in Os Font_and_Bitmap_Server should be (one of the) first topics you find.
Right at the top of the reference page you will see that the header file we need to use is FBS.H and the library we need to link against is called fbscli.lib.
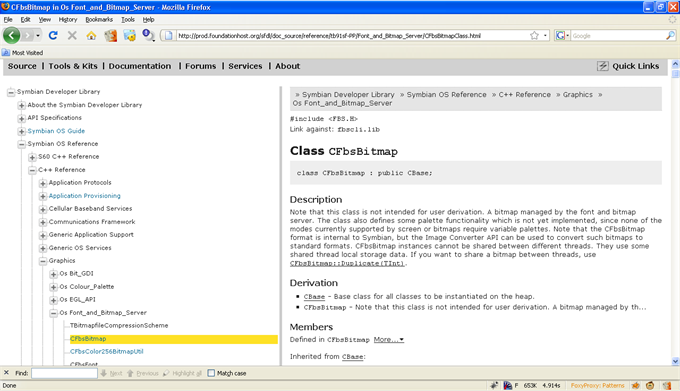
This class is capable of storing a bitmap. It's also possible to get direct access to the bitmap data. However for more convenient methods of drawing we will work through a drawing device and context.
To find out more about bitmaps, contexts and drawing functions, Search for ‘bitmaps’ in the documentation, and go to the page Bitmaps in Using Bitmaps, or Using Bitmaps in Using Graphics Device Interfaces. Symbian provides several different device and context classes. For our application we’re going to use CFbsBitmapDevice (header file: bitdev.h, library: bitgdi.lib) and CFbsBitGc (header file: bitstd.h, library: bitgdi.lib).
Adding Libraries To a Project
In the previous step, we determined that we need two libraries in order to use all three bitmap-related classes: fbscli.lib and bitgdi.lib. To add them to our project, open the HelloWorld.mmp project file (in the /group/ folder if you’re using the Project Explorer window). Switch to the Libraries tab. At the top of this page, you will see a list of included libraries. fbscli.lib is already in the list, so we don’t need to add it. However bitgdi.lib is missing.
Click on the Add button. Search for bitgdi.lib in the list and add it to the Libraries list.
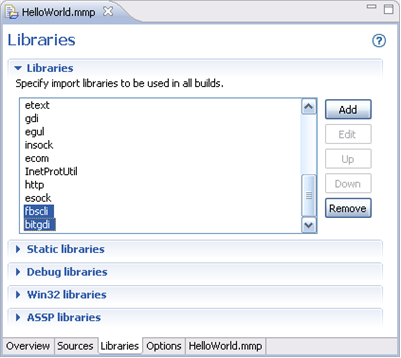
When you’re finished, make sure that both libraries are in the Libraries list.
Creating Bitmaps
Now the libraries have been added, we can use the bitmap classes in our project. Open the file HelloWorldContainer.h and add the following include statements:
#include <fbs.h>
#include <bitdev.h>
#include <bitstd.h>
We also need to store the bitmap objects as instance (member) variables. Add the following definitions to a private section of the CHelloWorldContainer class. Be careful not to write anything into areas managed by the UI designer, because your changes could be overwritten. These areas are marked by comments.
private:
CFbsBitmap* iBitmap;
CFbsBitmapDevice* iBmpDevice;
CFbsBitGc* iBmpGc;
Symbian C++ uses some naming conventions. Instance variables should have a lowercase i at the beginning of the variable name (iBitmap). Arguments should be marked by an a (aBitmap). Normal local variables that you create inside a function do not need any prefix. That way, you instantly know where the variable is coming from – this is very important when deleting objects. Next, we want to create the bitmap. Define and implement a new method:
void CHelloWorldContainer::CreateBitmapsL()Let’s go line by line through the required code for this method: First, we have to make sure that any previous objects are deleted if they already exist. This would be required (for example) if the running application needs to re-create the bitmap because the screen layout changes. You don’t need to add an if statement to check if the pointer is NULL beforehand – the C++ delete statement only deletes the object if the pointer is not NULL. You do however need to ensure that the objects are set to NULL after deletion to avoid possible "double deletion" in the destructor.
delete iBitmap; iBitmap = NULL;
delete iBmpDevice; iBmpDevice = NULL;
delete iBmpGc; iBmpGc = NULL;
This following line of code should look familiar – it simply creates an instance of the CFbsBitmap class:
iBitmap = new (ELeave) CFbsBitmap();
The (ELeave) parameter is Symbian C++ specific. This causes a leave (the Symbian C++ equivalent of standard exceptions) if allocating the object fails – for example, because there is not enough free memory. With the (ELeave), you don’t have to manually check if the pointer is actually pointing to a valid object after creating the object instance. You can find out more about leaves in Fundamentals of C++.
We do not handle the potential leave here; that’s why the method name (CreateBitmapL()) has a trailing L to show that it can also leave. More on this topic in a moment.
Now, it’s time to let the CFbsBitmap class allocate the memory for the bitmap it is going to manage. The available drawing size for our container can be queried by the method Size() from its base class. EColor16MU specifies the color depth – in this case, it’s a true color display mode with 32 bits per pixel; the top byte is unused. The color mode EColor16MA would use the top byte for the alpha channel, several other modes are available as well.
iBitmap->Create(Size(), EColor16MU);
The next line creates a graphics device based on the bitmap. A graphics device represents the medium being drawn to and is needed to create a graphics context. The use of a NewL() method is common in Symbian C++; it is a static factory function which returns a fully constructed object of the desired type.
iBmpDevice = CFbsBitmapDevice::NewL(iBitmap);
A graphics context provides a large number of drawing operations, along with state settings defining how the drawing is performed. The bitmap graphics context used here is a specialization of the generic graphics context and adds some methods that can be used for bitmaps only – such as clearing and copying rectangular areas.
iBmpDevice->CreateContext(iBmpGc);
Whenever you create objects, it’s best to think about where and when they are going to be deleted right away. Memory leaks are a serious issue on a mobile device where no virtual memory is available and the main memory is limited to 30-80 MB. Therefore, go to the destructor of CHelloWorldContainer and add the required statements for deleting the three objects:
delete iBmpGc;
delete iBmpDevice;
delete iBitmap;
The next step addresses the remaining question: where to call the CreateBitmapsL() method. Of course, you could do this from the construction methods of the class. But what if, while your application is running, the user physically turns the phone, causing it to switch from portrait to landscape mode? Because the bitmap was created with the portrait size in mind, the user would no longer be able to use the full screen for drawing.
Therefore, we have to react to events that inform us when the screen size is changed. In those situations, SizeChanged() is executed. When the container is first constructed, its size changes as well. Because of this, we can simply call our CreateBitmapsL() method from within SizeChanged():
void CHelloWorldContainer::SizeChanged()
	{
	CCoeControl::SizeChanged();
	LayoutControls();
	// [[[ begin generated region: do not modify [Generated Contents]
	// ]]] end generated region [Generated Contents]
	if (!iBitmap || (iBitmap && iBitmap->SizeInPixels() != Size()))
		{
		TRAPD(err, CreateBitmapsL());
		}
	}
In the source code above, an additional check ensures that the bitmap is only re-created if the size available for the container is really different to the existing bitmap size – the SizeChanged() method is also called, for example, when the option menu obscures part of our view. This does not affect the available space for our drawing area and therefore should not lead to re-creating the bitmap.
But what is the TRAPD() statement doing here? Let’s use this to take a closer look at the concept of leaves.
Leaves
When programming using Symbian C++, an L is appended to the name of methods that can leave (usually because it contains other methods that can leave and does not choose to "TRAP" them). Note: this is a helpful convention, but is not checked or required by the compiler.
Our CreateBitmapsL() method contains two methods that can leave: the (ELeave) parameter causes a leave if there is not enough memory to allocate the object. The NewL() method from the graphics device also has a trailing L – meaning that this method can also leave. We did not catch any (all) of those leaves in the CreateBitmapsL() method so it was named with a trailing L.
Any leaves are passed up in the call stack until caught by a TRAPD macro. The SizeChanged() method traps any leaves from CreateBitmapsL() and consequently does not need to have a trailing L.
The error code of the leave is stored in the err variable, which is declared as a normal integer by this macro. It would be a good idea to take a look at the contents of this variable and to handle errors instead of ignoring them as we’re doing here. But for the sake of simplicity, we do not handle any errors that might occur in this situation.
Tip
A good way to automatically check your code for potential problems is to use the CodeScanner tool that comes with Carbide.c++. It is a static code-analysis tool looking at Symbian coding rules and standards. Find out more at: http://carbidehelp.nokia.com/help/topic/com.nokia.carbide.cpp.codescanner/html/codescanner.htm
Handling Touch Events
TPoint iLastPos;
TPoint is a convenience class that stores two integers that can be used as co-ordinates. Additionally, it provides some methods to modify the point. We do not need to initialize the variable in the constructor of the CHelloWorldContainer class – the container class is indirectly derived from the class CBase, which automatically zero-initializes all member variables. Touch events are delivered to the container class, which is responsible for managing the visible UI content in the main pane of your application. To handle the events ourselves, we have to override the following method in CHelloWorldContainer:
void CHelloWorldContainer::HandlePointerEventL(const TPointerEvent& aPointerEvent)
if (aPointerEvent.iType == TPointerEvent::EButton1Up)
  {
  }
Drawing the line itself is rather simple. First, define the color and style that should be used for drawing, then call the function for drawing the line. Note that the settings concerning the color and style stay active until they are changed again in this graphics context – you do not need to set them every time when executing consecutive drawing operations.
iBmpGc->SetPenColor(KRgbRed);
iBmpGc->SetPenSize(TSize(2,2));
iBmpGc->DrawLine(iLastPos, aPointerEvent.iPosition);
Next, we have to save the new position, because it will be required as the starting point for the next line.
iLastPos = aPointerEvent.iPosition;Finally, issue a request to the framework to redraw the screen. Otherwise, the user won’t see the new line!
DrawDeferred();At the end of the method, also call the HandlePointerEventL() method of the base class (the container is derived from CCoeControl, because it is a normal UI control by itself):
CCoeControl::HandlePointerEventL(aPointerEvent);To sum it up, this is the final code for the HandlePointerEvent() method:
void CHelloWorldContainer::HandlePointerEventL(const TPointerEvent& aPointerEvent)
    {
    if (aPointerEvent.iType == TPointerEvent::EButton1Up)
      {
      iBmpGc->SetPenColor(KRgbRed);
      iBmpGc->SetPenSize(TSize(2,2));
      iBmpGc->DrawLine(iLastPos, aPointerEvent.iPosition);
      iLastPos = aPointerEvent.iPosition;
      DrawDeferred();
      }
    CCoeControl::HandlePointerEventL(aPointerEvent);
    }
We’ve already added all the code required for drawing to the bitmap, but this bitmap still has to be transferred to the screen. The CHelloWorldContainer::Draw() method is called when the system wants the contents of the container to be redrawn. Therefore, we need to add the following line of code to the end of the Draw() method, which copies the bitmap to the top left of the graphics context of the screen:
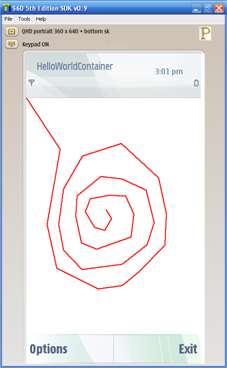
gc.BitBlt(TPoint(0, 0), iBitmap);Now compile the project. It should already work – you can draw red lines by just clicking inside the main pane of the emulator!
Defining a Menu
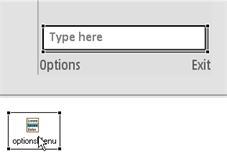
The application would be improved if the user could clear the drawing during use, rather than having to restart it. This section shows how you add and handle menu items to provide this functionality, and to exit the application Open the HelloWorldContainer.uidesign document. You can find it in the root folder of your project in the Project Explorer or in the UI Designs folder of the Symbian Project Navigator.
Click on the Options menu item below the UI design to reveal the menu. As indicated, you simply need to click on the empty menu item and start typing.
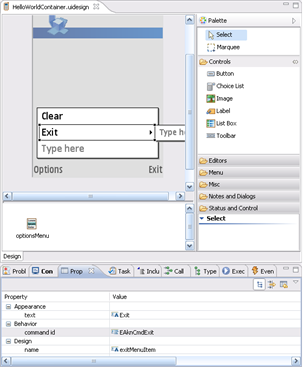
Add two menu items – Clear (for clearing the image) and Exit (for closing the application).
Then click once on the Exit menu item to select it. Go to the Behavior group of the Properties window and change the command ID to EAknCmdExit (this is available in the drop-down list). This command will also be sent to your application if the operating system wants to shut it down, for example, when the phone does not have enough memory left. Therefore, it is necessary that every application always responds to this event and instantly shuts the application down. It is already handled by the basic application that the Carbide.c++ wizard generated for you; you don’t need to implement the command handling for this event yourself.
If you try your application now, you will see that the Exit menu item already works.
Tip
When testing the application, always quit your application using the Exit command (rather than just closing the emulator). The application environment will then automatically check for memory leaks. If you just shut down the emulator you may not discover the leak until much later, making it a lot more difficult to find the cause.
Clearing the Drawing
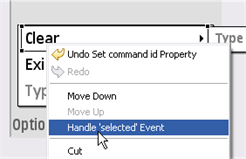
Whenever the Clear menu item is selected the view class method CHelloWorldContainerView::HandleCommandL() is called with the command ID of the menu item as a parameter.
If we want to handle the menu item, the UI designer can create the necessary code for us. Right-click on the menu item and choose Handle ‘selected’ Event. The UI designer will ask you to save the design – choose Yes. The code will then be generated and you will jump into the code view to a new method called HandleClearMenuItemSelectedL() – a more convenient place to put your command-handling code than directly in a big HandleCommandL() method that receives all commands. The auto-generated source code therefore calls the new extra method from within HandleCommandL() (take a look at that method to see what really happens).
Now, we only need to tell the container that it should clear its bitmap buffer. To do this, create a new public method in the container:
void CHelloWorldContainer::ClearDrawing()
  {
  iBmpGc->Clear();
  DrawDeferred();
  }
Now, call this method from the menu item handler method. As explained in the section about the application architecture, the view class (CHelloWorldContainerView) is the controller and owner for/of the container class (CHelloWorldContainer). Therefore, this class has a pointer to the container as an instance variable, which you can use to clear the drawing.
TBool CHelloWorldContainerView::HandleClearMenuItemSelectedL(TInt aCommand)
  {
  iHelloWorldContainer->ClearDrawing();
  return ETrue;
  }
The menu command should now clear the image.
Congratulations, you have completed the tutorial and have created your own small mobile painting application!
Further Exercises
As an exercise, it’s a good idea to extend the application by yourself – for example, you could add some menu items that allow the end user to change the color of the pen.
Tip
It’s a good idea to learn keyboard shortcuts as early as possible, because they can significantly increase the efficiency of your work. For example, you can press Ctrl + B to build the project, instead of using the icon or the menu commands. Also very helpful: Ctrl + Shift + F automatically formats and indents your code. You can get a full list of commands by pressing Ctrl + 3. A hot keys list appears when you press Ctrl + Shift + L.
Importing Other Examples
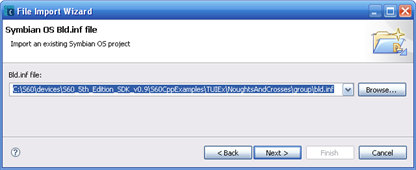
The S60 SDK itself installs many examples; additional applications can be downloaded from the developer.symbian.org and Forum Nokia (see the Related Info section for more information). To import ready-made applications in Carbide.c++, go to File | Import. In the following dialog, select Symbian OS Bld.inf file and click Next.
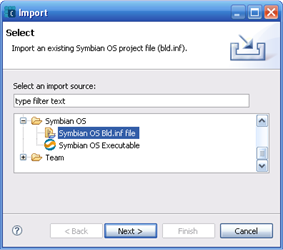
Now, click Browse and navigate to the bld.inf file of the project you want to import. It’s usually stored in the /group/ subfolder of the project.
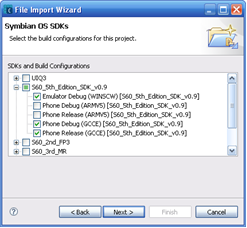
In the following step, select which SDKs you would like to use. The same considerations as those explained when creating your Hello World application apply.
You can usually accept the default values for the next step and let the wizard import everything.
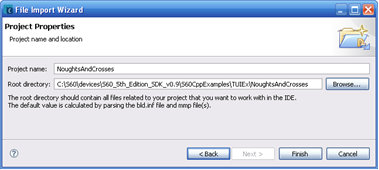
In the last step, you have to define the Project Properties. In most cases, you can leave the default values.
Afterwards, the project is imported and you can start working. The project contents will not be copied to the current Carbide.c++ workspace, so you will work directly on the original directory and the original files. Copy the project to a different directory first if you want to keep the original project or example in its original state – for example, into the workspace directory.
Troubleshooting: If importing the project fails, take special care of the last step of the import process: the root directory should be set correctly to the root directory of the project and not one level above it. Also, the project name should be the same as the last part of the root directory. From time to time, the default values are not configured properly, causing problems in the import process.
Warning
Do not use the standard (Eclipse) project import! The reason is that this import method would also import all build configuration settings, including references to installed SDKs and paths on the original system. Therefore, if you import a project from somebody else but don’t have the SDK installed in exactly the same directory, the build configurations will no longer work. The bld.inf import method recreates the SDK bindings and only imports the real contents of the project.
Summary
This part of the tutorial has shown how we can extend the basic skeleton from the Symbian C++ Quick Start to create a small paint application. The tutorial explains the application framework, including how you define menus, how to handle touch-screen events, drawing to the screen etc.
Copyright ©2010 Nokia Corporation and/or its subsidiary(-ies).
All rights
reserved. Unless otherwise stated, these materials are provided under the terms of the Eclipse Public License
v1.0.