Symbian C++ Quick Start
This Quick Start is relevant if you want to create Symbian C++ applications that run on Symbian devices - i.e. "on top" of the Symbian platform. Typically this will include: professional application and games developers, professional service companies, hobbyist developers and students.
The tutorial shows you how to get the development tools (e.g. IDE) and set up your development environment. It then shows you how to create a skeleton application using Carbide.c++ and UI designer, and how to get it up and running on both the Symbian Emulator and on the device; the whole process takes just a few minutes!
Comes with Code: File: HelloSymbianWorld Example Code.zip
Set up the development environment
Assuming your computer meets the System Requirements then setting up your PC for Symbian C++ development is as simple as downloading and installing (do so in this order):
Perl. See the Kits Q&As for notes on the recommended version.
Software Developer Kit (SDK) (full installation) .
For help installing the SDK please refer to the Symbian^1 SDK Installation Guide.
You can now create your first application using the Carbide.c++ project wizard, as the following sections will describe.
Starting Carbide.c++
The Carbide.c++ IDE is installed as part of the free Application Developer Toolkit (ADT) (step 2 in the section above). It is the only supported/official IDE for Symbian C++ development.
Carbide.c++ is launched from the Windows Start button: All Programs | Symbian Foundation ADT v<ADTVersion> | Carbide.c++ | Carbide.++ v<CarbideVersion>.
On start, you will be prompted to select a workspace directory. The workspace directory contains any projects you’ve already created in the workspace and their common settings - such as code-formatting options (you can define multiple workspaces in order to separate completely different tasks). If this is the first time you've run Carbide.c++ the workspace will be empty.
If you installed the SDK to drive C:\, an example of a correct workspace path is: C:\Symbian\development\.

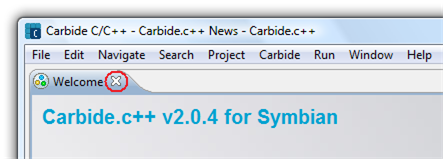
Once Carbide.c++ has started, close the Welcome tab (by clicking the cross shown circled in red below) to see the default workspace.
Creating a Project
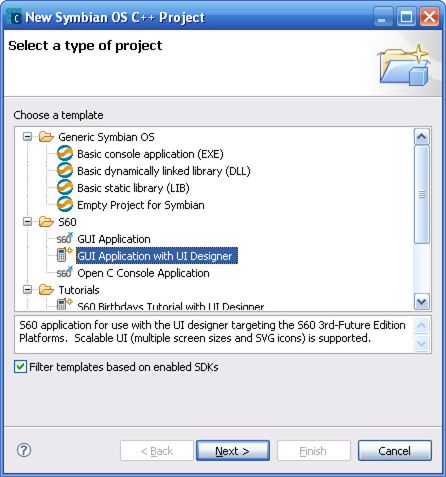
To launch the Carbide.c++ Create New Project Wizard select: File | New | Symbian OS C++ Project.
Choose the GUI Application with UI Designer application template (see S60 section). This template creates a runnable GUI application with the UI Designer tool enabled (the UI Designer allows views to be created "visually" by drag & dropping standard UI components).
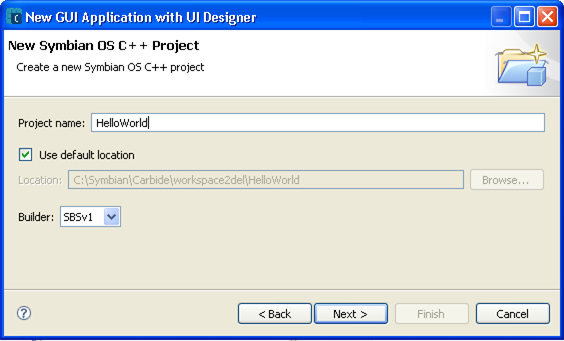
The Next page of the wizard is "New Symbian OS C++ Project". Define the project name - in this case "HelloWorld". Once again, make sure the project directory is on the same drive as the SDK and does not contain spaces or other special characters.
The Next page of the wizard is "Symbian OS SDKs". Choose the SDK(s) you want to use for building the project from among those installed to your PC (You can add more SDKs to your project later on). This should include a Symbian platform SDK. At time of writing the only C++ Application Development SDK is the Symbian^1 SDK (Note: this is a copy of the S60 5th Edition SDK v1.0).
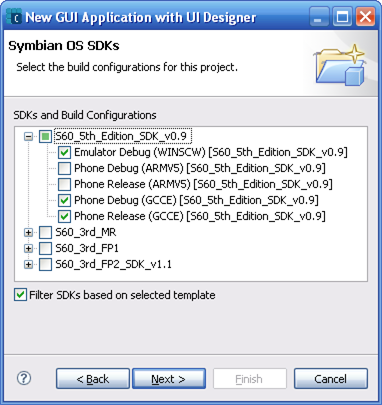
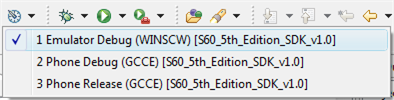
By default all build configurations will be selected:
Emulator Debug (WINSCW) builds binaries for the Windows-hosted emulator.
Phone Debug | Release (GCCE) builds binaries for the phone using the (free) GCCE compiler that was installed with the SDK.
Phone Debug | Release (ARMV5) builds binaries for the phone using the ARM RealView Compiler (RVCT). RVCT produces code that is a few percent smaller and faster than the current versions of GCCE supported for Symbian C++ development, but must be separately licensed from ARM. RVCT is primarily used by phone manufacturers to build binaries for device ROM.
Most developers should simply de-select the ARMV5 options above as shown (the Emulator is needed by all developers, and GCCE is sufficient for most third-party development).
The Next page of the wizard sets the "Application properties".
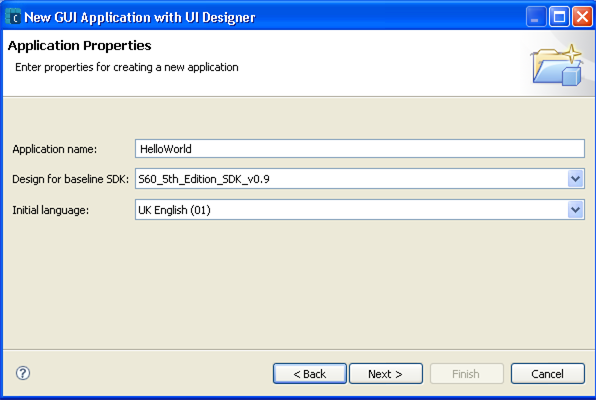
Keep the default values. The Baseline SDK defines the common compatibility level of your application. For example, if set to the S60 5th Edition SDK, the UI designer doesn’t let you add elements that are only available in later S60 5th Edition, Feature Pack 1+ SDKs and devices.
The Next page of the wizard allows you to choose an S60 UI design. Keep the Empty user interface variant.
The Next page of the wizard "Container Name and Type" has default values that are usually acceptable.
The Finish button is active in this page. The next page is optional but for the purposes of this tutorial you should click Next, rather than Finish.
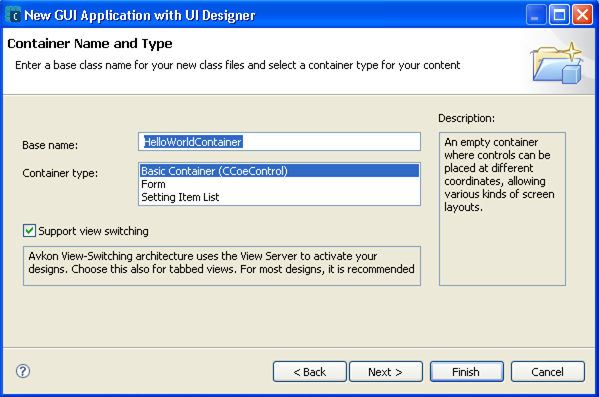
Even though our application will only use one view, it’s usually better to check "Support View Switching", in order to make the application easier to extend later on.
The Next page of the wizard "Basic Settings" can be used to customize the project with your name and a copyright notice for every human-readable file. It also allows you to specify the application unique identifier (UID).
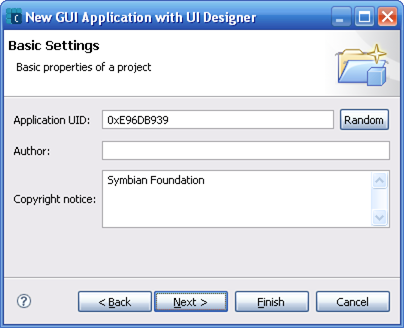
The UID (actually the SID, but for the moment we can ignore the distinction) defines the private area in the file system in which the application can store its data. Among other things the UID can also be used to programmatically identify and/or start the application.
Carbide.c++ generates a random UID value for you starting with ‘0xE’, which is the range of UIDs reserved for internal development and testing. If you want to release your application to the public, you need to get your own unique UID allocated by Symbian Signed.
As we do not intend to release our Hello World application to the public, we’ll simply continue to use the value Carbide.c++ assigned us from the development range (you can change the UID later on, although you must be careful to change every instance of it found within your project - see How to change your application's UID).
Select Finish to close the wizard and create your application (there is no need to go to the Next (last) page of the wizard as the default values are always acceptable).
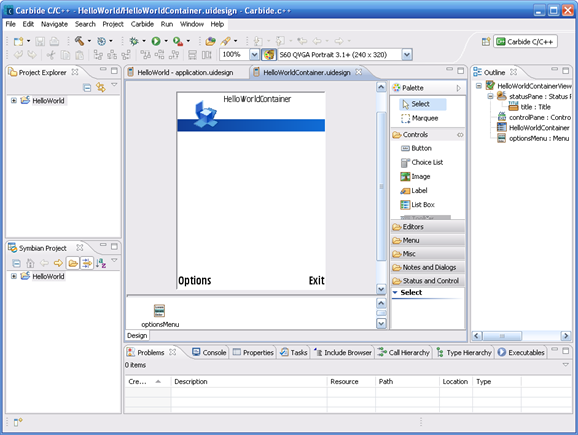
That's it, your workspace should look similar to the screenshot below.
Targeting the Emulator
Normally you'll start by building for the emulator; you can use the emulator for most of your development work (it is possible to access the Internet through the emulator, and even simulate GPS).
Building for the Emulator
First set the active build configuration. You can do this by clicking the Manage configurations for the current project icon
 in the toolbar
or by selecting menu: Project | Build Configurations | Set Active and select Emulator Debug.
in the toolbar
or by selecting menu: Project | Build Configurations | Set Active and select Emulator Debug.
Then build the current configuration using the Build icon
 in the toolbar or through the menu: Project | Build Project (You can also select a particular configuration to build from the
Build icon selector).
in the toolbar or through the menu: Project | Build Project (You can also select a particular configuration to build from the
Build icon selector).
Warning: If you get an error message similar to "WARNING: EPOCROOT does not specify an existing directory", you did not place your workspace/project on the same drive as the application development SDK (which is installed by default to C:\). Delete the project and start again. The diagram shows how this might appear in Carbide.c++:

Running on the Emulator
If your application
built successfully, click on the Run button  (Ctrl +
F11). Upon the first launch of your project, Carbide.c++ will ask
you which executable you want to launch:
(Ctrl +
F11). Upon the first launch of your project, Carbide.c++ will ask
you which executable you want to launch:
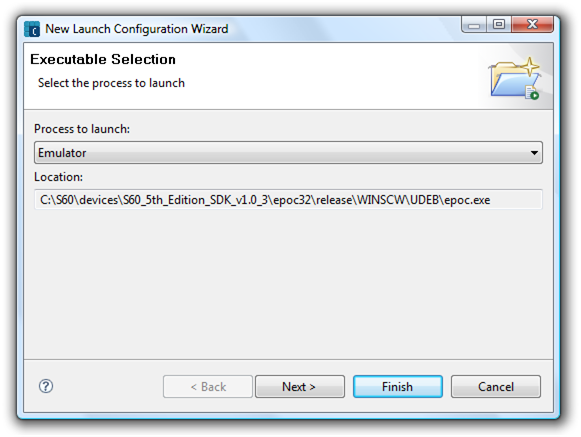
If you choose HelloWorld.exe, the emulator will be launched and your application started automatically. The emulator will close once you exit your application.
If you choose Emulator the emulator (epoc.exe) will be launched and you will need to navigate to the application and start it by clicking on the icon (just as you do when starting an application on a device). We’ll explain how to find the application shortly.
It may sound more difficult to choose the second method, but it has some advantages. You can leave the emulator running if you are only doing small edits in your source code – simply close your application in the emulator, recompile and restart your app through the emulator’s menu. You’ll also see any error messages that may be shown when you exit the application, because the emulator will not shut down instantly after you exit Hello World in the emulator. Those error messages are also visible in Carbide.c++’s console window.
When the emulator starts for the first time you might have to wait for several minutes before it is completely ready for use. Successive starts will be a lot faster, because Windows caches most of the emulator DLLs.
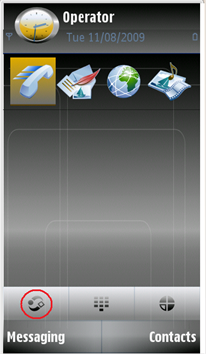
If you decide to launch the emulator and navigate to your application: First, open the menu through the S60 menu symbol on the bottom left of the screen. Your own application will be located at the bottom of the Applications folder; use your mouse to navigate in the emulator’s menus.
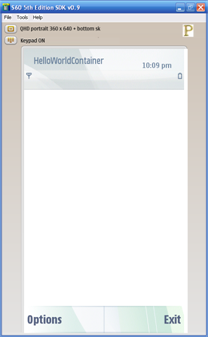
When you launch your application, the main pane will be empty. As you can see, the example application the wizard has created already supports a full user interface and handles input from the left and right softkeys at the bottom of the screen.
Debugging on the Emulator
The Emulator
is the default debug target - you simply click the Debug button  .
.
Debugging on the Emulator is not covered further in this tutorial. See Carbide.c++ User Guide > Debugging projects for extensive information on debugging using Carbide.c++.
Targeting the Device
The emulator can be used for most of your development work. However, some situations still require a real device – for example, when you want to use the camera or the acceleration sensor.
Tip: You should test your applications on the phone from time to time, even if it is fully supported by the emulator.
When you've finished development, you'll also want to build a release version; stripping out debug code and symbol information to make your binaries smaller and more efficient.
Building for the Device
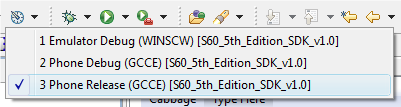
To tell the IDE that you want to build for
the device, change the active build configuration to a phone-release
configuration for GCCE (unless you have the RVCT compiler). As before, use the Manage
configurations for current project toolbar icon ( ) to select
the active-build configuration.
) to select
the active-build configuration.
Next, choose to build the current configuration using the
toolbar Build icon  (or in the
menu: Project | Build Project).
(or in the
menu: Project | Build Project).
This will automatically compile the project using the GCCE compiler and create an installation package – a file called HelloWorld.sisx in your project's \HelloWorld\sis\ directory. You now need to transfer this file to your phone to install it.
Tip: Use Carbide.c++ to find the file on your PC. Navigate to the file in the project view, then right-click on it and select Show in Explorer.
Don’t forget to switch back to the Emulator Debug build configuration when you continue development!
Installing on the Device
You can use the PC Suite that came with your phone to install the application on your device
Ensure that the PC Suite is installed and running
Connect your device to the PC via Bluetooth or USB and add the phone to the known devices in the PC Suite (if necessary).
Double-click the .sisx file in Windows Explorer or the Project Explorer window of Carbide.c++.
If the PC Suite is not installed on your PC, you can send the file to the phone via Bluetooth or IrDA (if available):
Locate the .sisx file in Windows Explorer
Right-click on it and select Send to | Bluetooth device.
You will be prompted to install the application when you open the message.
Warning: If you get a Certificate Error message when you try to install the application, then your phone has been configured to prevent installation of self-signed sis files. To change this behavior, go to Settings - Application manager - Installation settings - Software installation and change the setting from Signed Only to All. For other errors received upon installation, consult the installation error troubleshooting guide.
Debugging on the Device
Debugging on a production phone is covered in the topic: Getting Started with Debugging on the Device.
Building on the Command Line
It is also possible to build your applications using the command-line based Symbian toolchain. If you've never done so before you will first need to set up the environment using the tool provided:
Select the windows start button and select: Start | All Programs | Symbian Foundation ADT v1.0 | Carbide.c++ | Configure environment for WINSCW command line
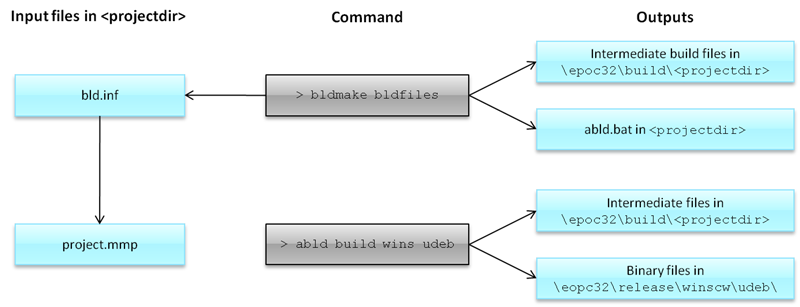
Open a command prompt in your project's /group/ folder (where the bld.inf project file is located) and do:
bldmake bldfiles
abld build
The command bldmake bldfiles creates a batch file abld.bat based on the component-definition file (bld.inf) and the project-definition file(s) (.mmp). The abld build command uses the batch file to build all the default targets (i.e. for gcce and Emulator).
You can build just one target using
abld build <target>
For example, "abld build winscw udeb" builds just the emulator debug variant.
You can start the emulator by selecting its executable in your file system (it will be located at SDK DIRECTORY\epoc32\release\winscw\udeb\epoc.exe).
An overview of the commands and the generated outputs is shown below. There is also extensive documentation on the build process in the Symbian Developer Library: Symbian OS build process.
Troubleshooting
For the vast majority of users the preceding instructions can be followed through without issue. If however you have any build issues, then please follow the following instructions to check that your environment is set up correctly and troubleshoot any problems that may arise.
Summary
In this tutorial you set up your development environment, learned how to create a skeleton application using Carbide.c++ UI Designer, and how to get it up and running on both the Symbian platform emulator and on the device.
In Going Beyond Hello: A Tutorial for Symbian C++ Applications we will extend the basic skeleton to create a small paint application, along the way learning more about the application frameworks (e.g. defining menus, how to handle touch-screen events, drawing to the screen etc.).
Related Info
Further reading:
Going Beyond Hello: A Tutorial for Symbian C++ Applications provides a step by step guide to creating your first "real application", covering the key elements of the application framework.
Fundamentals of Symbian C++ provides all the essential information you need to understand Symbian C++.
About the Kits:
Copyright ©2010 Nokia Corporation and/or its subsidiary(-ies).
All rights
reserved. Unless otherwise stated, these materials are provided under the terms of the Eclipse Public License
v1.0.